
Cocktails have gone off the deep-end with torched garnishes and smoke-brimming cloches, but you can still explore the world of fancy drinks at home without any special equipment. Take, for example, the float. Simple yet elegant, and clearly involving some know-how, adding a float, or layers, to your libations is often done with a special tool called the bar spoon. Luckily for the rest of us regular spoon folk, we can achieve the same effect with a simple pouring technique.
Complementary liquids of different densities and colors are poured into the same glass to create a striking visual effect. When done properly, the layers won’t mix. The finished drink will have defined lines highlighting each addition. A float, which takes the form of a thin layer at the top of the drink, uses the same technique. It makes for a dramatic presentation, and it can be satisfying for the drinker to stir everything together before enjoying.
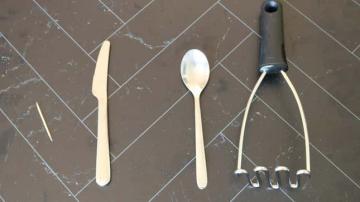
The bar spoon reminds me of the spoons that come with an ice cream sundaes served in a tall glass–long and skinny. The handle is thin, twisted, and about 12 inches long. The bowl of the spoon is only about an inch in diameter. Sometimes it’ll even have a muddler on the back end. The spoon’s shape engages the liquid along a meandering path and gently distributes it along the surface of the drink, as opposed to plunging down in a direct stream beneath the surface of the first pour. The handle’s swirl slows down the disruptive impact of the stream and the bowl distributes it to prevent the liquids from mixing.
Although the regular teaspoons in your silverware drawer don’t have a swirled handle, the bowl of the spoon will be enough to distribute the liquid gently so the layers don’t mix. All you have to do is flip the spoon over, so the concave cup-side is facing down, and hold the spoon close to the surface of the previous layer of liquid, so that it’s just touching. This is easier to do in a rocks glass, or as the top float in any other glass, since you want the spoon to be more parallel to the surface instead of steeply angled. If your angle sucks, try to get as close to the liquid as possible and hold the spoon against the wall of the glass. The wall will act as a second buffer to prevent the drink from mixing.
Ingredients I love for a Dark and Stormy

Photo: Allie Chanthorn Reinmann
Pour the layering liquid directly onto the rounded back of the spoon. I made my favorite layered drink, the Dark and Stormy, which you can see in the photos. Ginger beer is the primary mixer, and dark rum is layered on top. The spoon has an umbrella effect, and the rum pours off of the edges.

Photo: Allie Chanthorn Reinmann
The tricky part is finding the right angle for the spoon so you stem the flood, without liquor dripping off the back of the neck. I lost a little rum, sadly.
Try this technique with layered drinks like a pineapple passionfruit Tom Collins, B-52 cocktail, a New York sour, or if you’re a beer lover, try a Black and Tan. Note that the floating liquid can’t be heavier, or more dense, than the one that came before it, or the layer won’t hold no matter which spoon you use. Before you experiment with layering new creations, stick with proven recipes until you get the hang of it.