
While you really don’t need a special location or kitchen to make cheese, you will need some equipment—and, most importantly, a deep appreciation for cleanliness. I thought I knew about sterilization from my many years of canning, preserving, and fermenting, but I was in no way prepared for how diligent you must be when making cheese.
Before we dig into the curds and whey of it all, we need to start with the equipment you’ll need, and a basic understanding of cheesemaking steps.
Prepare the cheesemaking site and sterilize everything
You’re going to need a nice open space to work on your cheese. That space must be clear of absolutely all clutter, and must be immaculately clean. You’ll also need direct access to a sink, and while you are working on your cheese, you should not use that sink for anything else—the cross contamination risks are too great. You’ll also need access to a large burner on a stove (or a single large burner), so you can prepare the curds.
Early in the process, you’ll need a tall stock pot to sterilize all your utensils, tools, and even cheesecloth in boiling water.
White vinegar, the stuff that comes in the giant gallon jugs, will become your best friend. Keep it in a spray bottle nearby, and use it to spray down counters, tools, pots, pans, and even your hands as you work. It is amazing how much work can be wasted through contamination, so with every single action, you’ll want to ensure your hands are clean, and you’re only touching clean tools.
The cookware, utensils, and tools needed to make cheese
Most recipes you’ll find work with two gallons of milk, which means you need to work with a sizable stock pot that can hold at least 10 quarts. It doesn’t have to be an expensive stockpot—this is precisely the size you can often find at thrift stores—it just, again, has to be immaculately clean.
Some recipes specify cooking over a water bath instead of a stock pot on a burner. In those cases, I find a three-quart straight-sided sauté pan does the trick; its low profile doesn’t add much height to an already tall stock pot, so you don’t have to reach over to stir, and most stockpots will sit atop the sauté pan, if a little precariously.
You’ll also need a stainless steel colander, which is used to strain your curd. It’s helpful if it has handles, so it can rest on top of bowls or pots.

Photo: Oleksandr Yakoniuk (Shutterstock)
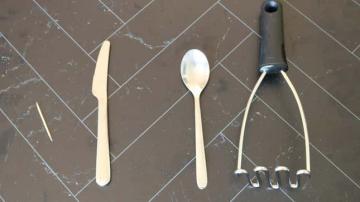
You’ll spend an awful lot of time standing at the stove, stirring milk. For those purposes, you’ll want a long, stainless steel slotted spoon. Every video I’ve ever seen of cheesemakers involves this spoon. Always use stainless steel so it can be sanitized. Are you sensing a theme?
You’ll also need a spider—a large draining utensil. This is used to pull curds out of the whey. Once you get advanced, you may want to purchase a cheese harp to cut the curds, but for right now, you’ll just use a long knife. This frosting spatula is longer than most knives and won’t scratch up your pots, and I’ve been happy with it. In some cases, you’ll use a stainless steel whisk, so having a large, long one will be helpful.
Thermometers are absolutely essential; you’ll want one long enough to clip to your pot, and I’ve enjoyed having a digital version. I also keep a backup thermometer around, just in case I’m in doubt.
You’ll need pH strips; eventually you’ll want to get a pH meter, but you can get away without it for some time. The pH will tell you how acidic your whey is at various times, which is information you will need.
Did you know that measuring spoons come in adorably tiny sizes? You do now, and they’re the only thing that will work when you need an eighth of a teaspoon.
It’s not called cheesecloth for nothing. You’ll go through a lot of it, so buy it by the yard. Get cotton cheesecloth that you can sterilize as you use it; it’s best to start with a few yards.
You’ll want a few small wooden cutting boards, which are used for draining your cheese. You need a few, as you’ll use two to flip your cheese. Wooden sushi mats are also helpful with this, as they allow for drainage. You’ll also need cheese molds. While each cheese technically demands a different mold, start with a basic set when making your first few soft cheeses.
Finally, you’ll need a ripening box. This is what the cheese goes into to age in your cheese cave. You don’t need to overthink this, though people often do. Tupperware of the right size is all you need; newer plastic storage containers that come with drainage mats inside are actually perfect for this endeavor.
Ingredients needed to make cheese
Cheese is made up of a few consistent ingredients: milk, cultures, rennet, and calcium chloride. Occasionally, there are additives that may be called for, such as annatto, the flavoring and coloring agent that gives certain cheese an orange hue, or lipase, which gives some cheeses an extra bite—but you shouldn’t order those until you need them.
Starting from the hardest to source, you’ll need to secure your milk. Without a doubt, you should not start making cheese as a cost-saving measure, unless you are reading this next to your cow, sheep, or goat. While milk is in abundance at the corner store, most of it is ultra-pasteurized, and that’s a problem. The ultra-pasteurization means your milk won’t set because the rennet won’t work. Grocery store milk is also homogenized, which means it’s been mixed up with all the other milk, and long story short: Your milk doesn’t have a lot of cream.
There are two solutions, and the first is pretty easy to source. Some markets offer just pasteurized milk, not ultra-pasteurized, and some offer vat-pasteurized or low-pasteurized milk. These names of correspond to different processes, and indicate the milk never went above a certain temperature. Those milks are often the kind that come in glass bottles and say things like “cream top,” and you can expect to pay $10-$12 a gallon. For your first few forays, this is the way to go.
You can’t buy sheep milk in most places, and most goat milk is also ultra-pasteurized, although Trader Joe’s gets regular pasteurized goat milk in from time to time. The trick becomes finding someone with fresh milk, and that’s not as hard as you might think if you know where to look. Almost anywhere, someone is peddling raw milk, and there are all kinds of different laws around all that, but the good news is, since you’ll be effectively pasteurizing it as you make the cheese, you won’t need to worry about the safety concerns that come along with using “raw” dairy.
Googling will get you started, and joining Facebook groups for raw milk or dairy trades in your area will eventually help you find someone. Ask around your farmers market. I lucked out and found someone with sheep and cow milk, and even though she’s an hour away, we now have a pretty good relationship where I can pop by whenever I’m in the area and say “hi” to the ladies in the field. Of note: You want the milk to be as fresh as possible, and in the case of cow milk, it can’t be frozen (frozen sheep milk is OK).
Once you’ve tackled the hardest part, the rest is easy. There are a few mail-order places to buy cultures from, but the one I’ve been happiest with is The Cheese Connection. It’s run by two women, their website is impressively comprehensive, and they are the only source in the United States I’ve found that ships cultures with ice packs. They’re also very helpful over email or the phone. While their site is just chock full of cultures to choose from, you’ll generally want to keep things simple to begin with, and invest in mesophilic and thermophilic cultures. All cheese cultures are one or the other, but you can get a generic meso and thermo to play around with to start.
You’ll also want to order your calcium chloride from them, as well as your rennet. Now, rennet comes in many forms, including vegan rennet and animal rennet. Personally, I’ve never had a lot of luck with vegan rennet, so I stick to the animal stuff, but it’s up to you. You can also source your cheesecloth, molds, and lots of other supplies from them. It’s hard not to go overboard, but as you’re starting out, so try to hold back.
Homemade cheese recipes
We’ve several recipes in this package to get you going, but to get acclimated to how cheesemaking works, I recommend watching videos from the contemporary Godfather of cheesemaking, Gavin Webber. He has a compendium of videos teaching absolutely everything about cheese and every possible kind of cheese, all for free on his website. If you feel yourself getting overwhelmed, relax. When armed with the proper equipment and a clean work environment, making your own creamy treasures is easy.